Your First NPC
This guide will walk you step-by-step through adding an NPC to some location on New Wirral. For simplicity's sake, we'll add it to the Gramophone Café, but the process will be identical for any location. First thing's first, if you haven't done so already, follow the steps in the official mod developer guide on the Cassette Beasts wiki to set up the Godot project before continuing. If you are unfamiliar with Godot itself, you may wish to consult a guide on that as well. No advanced knowledge of the editor or scripting will be necessary for this guide, but a basic understanding of the editor will be assumed.
Arriving at the Café
You can find the Gramophone Café interior scene at res://world/maps/interiors/GramophoneInterior.tscn. Double click it to open it in the editor. You should see something like this in the central editor window:
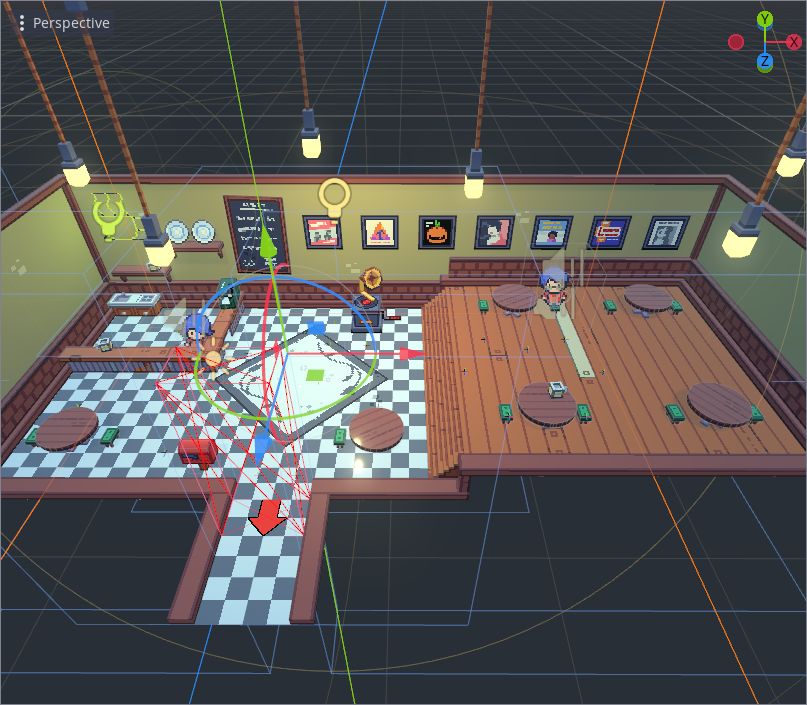
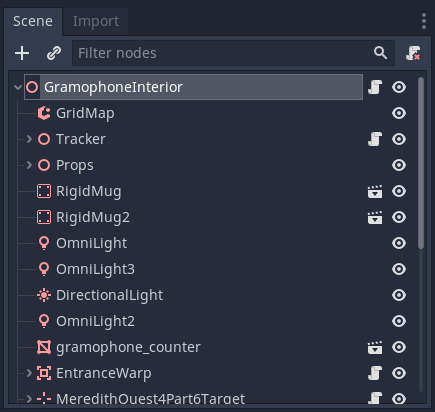
If you don't, click the 3D tab at the top, and this scene should appear. On the left you'll find the scene tree which contains all of the nodes that make up the Gramophone Café, including NPCs. You won't need to mess with any of these, so don't worry about what each one does. Our goal for now is just to add to this. Click the root node of the scene, GramophoneInterior, so it's selected. It should look like this:
With this node selected, click the ![]() Instance Child Scene button above the scene tree. This will bring up a list of existing scene files within the project, and will allow you to place a copy of one into the current scene. The scene we're interested in particular is
Instance Child Scene button above the scene tree. This will bring up a list of existing scene files within the project, and will allow you to place a copy of one into the current scene. The scene we're interested in particular is res://world/npc/HumanNPC.tscn. Find this scene in the list, or use the search to locate it by searching HumanNPC, then click Open at the bottom of the scene picker. Our Gramophone Café now has a new NPC. You'll probably see them stuck in the ground like this:
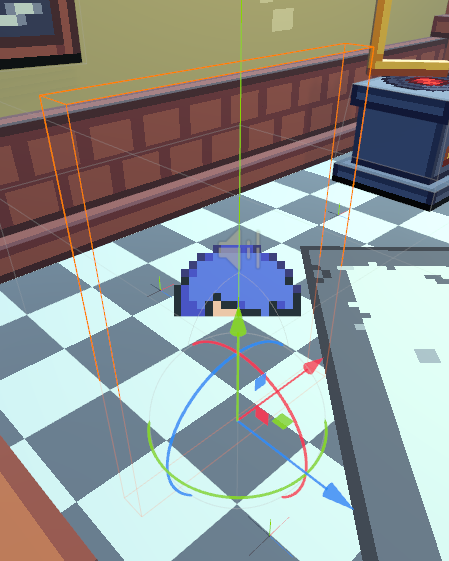
If you'd like, double click their node in the scene tree to give it a new name, to find it more easily if need be. I'll name it MyFirstNPC and refer to it as such for the purposes of this guide. If you don't see the movement gizmos on the NPC as in the screenshot above, ensure you are in ![]() Select Mode or
Select Mode or ![]() Move Mode by clicking one of the respective icons at the top of the 3D scene preview. If you still don't see them, click MyFirstNPC in the scene tree to ensure it's selected. Using the arrow gizmos in the 3D scene preview, you can move the NPC wherever you'd like in the scene. I recommend holding Control or your keyboard's equivalent while doing so, as it will snap the NPC to the grid, allowing you to place it close to the floor. I'll set them in the back of the café, between the two tables.
Move Mode by clicking one of the respective icons at the top of the 3D scene preview. If you still don't see them, click MyFirstNPC in the scene tree to ensure it's selected. Using the arrow gizmos in the 3D scene preview, you can move the NPC wherever you'd like in the scene. I recommend holding Control or your keyboard's equivalent while doing so, as it will snap the NPC to the grid, allowing you to place it close to the floor. I'll set them in the back of the café, between the two tables.
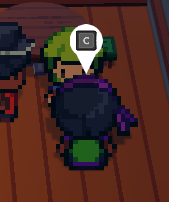
At this point, you can run this scene directly with the ![]() Play Scene button at the top right, or by pressing F6 on your keyboard. Don't worry about having to load your own save or start a new game - the game will generate a dummy save for you and put you right in the Gramophone Café. You can go visit our new NPC:
Play Scene button at the top right, or by pressing F6 on your keyboard. Don't worry about having to load your own save or start a new game - the game will generate a dummy save for you and put you right in the Gramophone Café. You can go visit our new NPC:
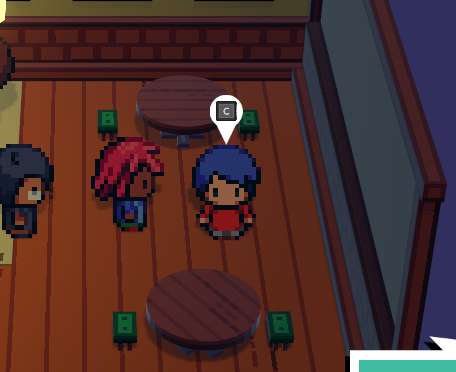
...only, they don't have much to say, and look rather plain. Let's take care of their looks first.
Inspections
On the right of the editor, you should see the Inspector for the node. If not, ensure the Inspector tab is selected on the right dock, found at the top. You'll see a whole list of properties belonging to our new NPC. Once again, if there is no information here, ensure MyFirstNPC is selected in the scene tree. Most of the properties here aren't important for the purposes of this guide, but most should be fairly self-explanatory. For starters, go ahead and set Initial Direction to a direction that feels natural for the NPC to be facing. I'll have them facing left, towards the rest of the café.
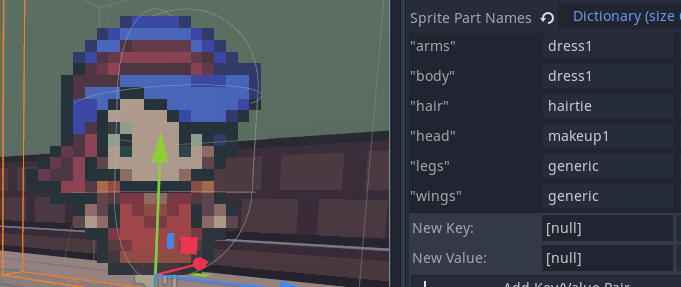
Next, let's give them a unique appearance. Let's change their clothes and hair first. Find the Sprite Part Names property near the bottom of the Script Variables list and click the field to the right of it to expand the list of their sprite names. It should look like this:
Don't worry about the part at the bottom pertaining to adding new keys and values, there's no reason to mess with that. Find the FileSystem menu on the left dock, and navigate to res://sprites/characters/world/human_layers. These are all the options we can use in Sprite Part Names, by typing the suffix of the filenames into the proper field. You may want to open this folder in an external file explorer to get a better look at the images if you'd like to pick something specific. As you type a valid name into each field, you'll see it reflect on the NPC in the editor window. Handy!
For this NPC, I'll change "arms" and "body" to "dress1", "hair" to "hairtie", and "head" to "makeup1", but use whatever values you'd like. Any value will work, even those unique to partners or other story-related NPCs. It is possible and rather easy to add your own custom sprite parts, but is out of the scope of this guide for now. Here's the NPC and inspector values after these changes:
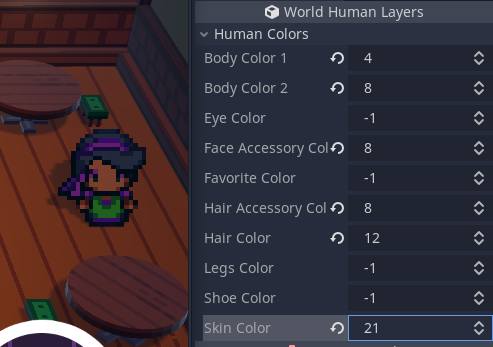
Now let's set some colors for them. You can use the Sprite Colors property above Sprite Part Names if you'd like, but scrolling down, you can find a World Human Layers category that is made specifically for adjusting these values. Either will work, but this is what we'll use for this guide.
Unfortunately, there is no preview for color choices in the editor itself. However, if you run the scene as before, changes you make here will still show up in game, so you don't have to guess what color is what. For the first 18 values (0-17), Sprite Colors corresponds to the colors you can select during character customization minus one, so for instance the color 13 (black) in character customization will be 12 here. You may notice that the colors apply even for skin tone, if you'd like to make a red or blue NPC. If you'd like to access the skin tones available in customization, they are 19-23 here. A value of -1 will cause that color to default to the color you see in the editor. Run the scene, and choose some colors you'd like for them. Here's what I went with:
Having a Chat
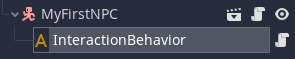
Thankfully, the vast majority of the heavy lifting for making interactions has already been done for us in the base game. There is a plethora of behaviors under the Action class we can use to give our NPC something to say and do, it's just a matter of knowing how to apply them. Cassette Beasts handles interactions with the res://world/core/Interaction.gd script. This exists as a node on all NPC-derived nodes, which includes our HumanNPC base node. The exact functionality of this whole script isn't important to this guide, all we need to know for now is that it looks for a node named InteractionBehavior that belongs to our NPC. Let's go ahead and add one. Make sure MyFirstNPC is selected and click the ![]() Add Child Node button at the top of the scene tree. Look or search for ActionBase in the list and expand it and its direct inherited node type Action, like so:
Add Child Node button at the top of the scene tree. Look or search for ActionBase in the list and expand it and its direct inherited node type Action, like so:
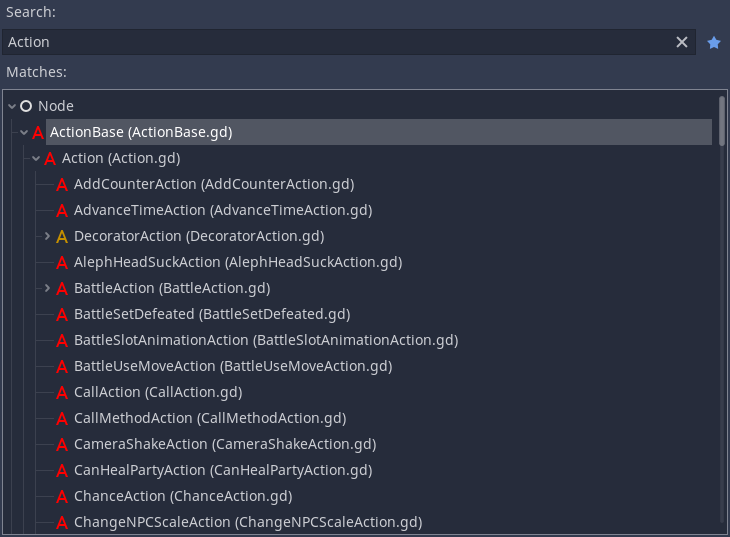
This list may be overwhelming at first, but don't worry, only a few of these will be relevant for now. Any Action-based node, Action included, has the functionality we need for interaction, but most generic NPCs use a DecoratorAction node for this or one based on it, so let's do the same. Click on DecoratorAction and click Create at the bottom to add it to MyFirstNPC, then double click the new node to rename it to InteractionBehavior.
We now technically have a valid interaction for this NPC, but currently it does nothing at all. Let's decide on what we want our interaction with this NPC to be. When we talk to this NPC, we'll prompt the player if they want to see the NPC jump. If the player says yes, the NPC will jump, and then remark on how good at jumping they are. If the player says no, the interaction will end there. Also, by default, interactions will not lock the player in place or turn the NPC to face our player, so we need to handle those things as well. Most Actions function by running each of their children in sequence, one after another, so each child should also be an Action-derived node. Actions can succeed or fail - if an Action fails, that typically marks the end of the sequence entirely, and no further Actions will be processed. For our case, we don't have to worry too much about the specifics, as the Actions we'll be using are largely intuitive.
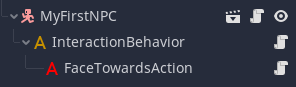
First, let's make the NPC face us when we interact with them. For this, we'll use a FaceTowardsAction node, so select InteractionBehavior, and go ahead to ![]() Add Child Node once again, and look or search for FaceTowardsAction, then Create it. Your tree should now look like this:
Add Child Node once again, and look or search for FaceTowardsAction, then Create it. Your tree should now look like this:
If you go ahead and run the game now, you'll find that... the NPC doesn't actually face you when interacting. What gives?
This is where ActionValues come into play. You probably noticed these when initially opening the ActionBase list:
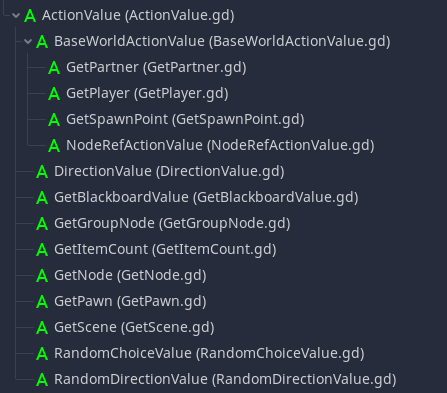
These are another type of node that derives from ActionBase (not Action!), that serve to supply Actions with various data they may need. You can check the scripts for each Action to see if they use values at all, but generally speaking, if an Action isn't behaving as you want, it's probably looking for ActionValues. For our FaceTowardsAction for instance, it expects to have an ActionValue child node that tells the NPC which direction to face. As the player is interacting with the NPC, we'd expect them to face us when we start the interaction.
With our FaceTowardsAction node selected in the tree, ![]() Add a GetPlayer node as a child. You may notice some special configurations for ActionBase nodes in the inspector. Don't worry about these for now, but generally they're fairly self-explanatory, as you may see with this GetPlayer node. Go ahead and test the scene again, and you'll see MyFirstNPC now faces us when we interact with them.
Add a GetPlayer node as a child. You may notice some special configurations for ActionBase nodes in the inspector. Don't worry about these for now, but generally they're fairly self-explanatory, as you may see with this GetPlayer node. Go ahead and test the scene again, and you'll see MyFirstNPC now faces us when we interact with them.
Next up, we'll want to lock the player in place, which is most easily done via Cutscene. Select InteractionBehavior again (not FaceTowardsAction), and ![]() Add a Cutscene node, which can be found under DecoratorAction, then under CheckConditionAction in the node selection menu. When you add this, you'll see a massive list of parameters in the inspector. Don't worry about any of these for now, we aren't going to use any of them. This Cutscene only exists to keep the player in place for its duration, which it does by default.
Add a Cutscene node, which can be found under DecoratorAction, then under CheckConditionAction in the node selection menu. When you add this, you'll see a massive list of parameters in the inspector. Don't worry about any of these for now, we aren't going to use any of them. This Cutscene only exists to keep the player in place for its duration, which it does by default.
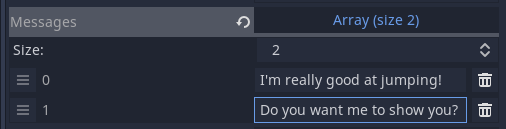
Now let's have the NPC talk to us. For this, select the Cutscene in the scene tree, and ![]() Add a MessageDialogAction node as a child. This node is where we're first going to utilize the inspector properties for our Actions. To keep it simple, we're just going to add a value to Messages, so expand the array by clicking on the field, and set the size to however many messages you want the NPC to say. I'll add these two:
Add a MessageDialogAction node as a child. This node is where we're first going to utilize the inspector properties for our Actions. To keep it simple, we're just going to add a value to Messages, so expand the array by clicking on the field, and set the size to however many messages you want the NPC to say. I'll add these two:
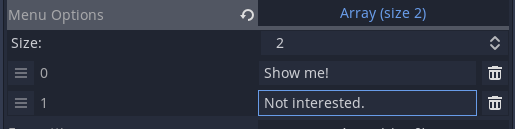
When it comes to prompting the player for a choice, there are a few ways to go about it. Namely ConfirmDialogAction and MenuDialogAction. MenuDialogAction is slightly more complex, but it gives us more control for customizing the responses, as well as working in tandem with our previous MessageDialogAction, so that's what we'll use for this guide. This time, we want it to also be a child of our Cutscene, rather than our newest node, so go ahead and ![]() Add a MenuDialogAction, and ensure it's below MessageDialogAction - Actions run in the order they are in the tree. In the inspector for MenuDialogAction, you'll notice a Menu Options property, which are the choices we can make at this point. Similarly to MessageDialogAction, I'll add two as such:
Add a MenuDialogAction, and ensure it's below MessageDialogAction - Actions run in the order they are in the tree. In the inspector for MenuDialogAction, you'll notice a Menu Options property, which are the choices we can make at this point. Similarly to MessageDialogAction, I'll add two as such:
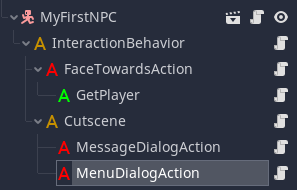
Go ahead and run the scene again to have a chat with them. Your tree should now look like this:
As an aside, if you wish for the message to still be visible when making the selection, reselect MessageDialogAction and disable Close After in the property list. This determines whether or not to close the last message in Messages before moving on to the next action. This is optional, as all other behavior will remain the same. For this guide, I'll go ahead and disable it, as it feels a little more natural.

MenuDialogAction handles the selection you make by running a child action corresponding to which choice you make. So for instance, if you select the first of the two given options, and MenuDialogAction has two children Actions, it will run the first Action in its list of children. For our case, we're only going to worry about adding one child Action, since making a choice that has no corresponding child Action ends the sequence as we are looking for anyway.
To keep our entire sequence from here on organized, we'll ![]() Add the fittingly named Sequence node as a child to MenuDialogAction, which can be found under CompositeAction. This node is primarily a way to organize your Action trees to contain Actions as children and run them all in a sequence, and is particularly handy here for separating behavior between MenuDialogAction options. I'll rename it to ConfirmSequence to make it clear what it corresponds to, but you can name it anything you'd like, or leave it as is.
Add the fittingly named Sequence node as a child to MenuDialogAction, which can be found under CompositeAction. This node is primarily a way to organize your Action trees to contain Actions as children and run them all in a sequence, and is particularly handy here for separating behavior between MenuDialogAction options. I'll rename it to ConfirmSequence to make it clear what it corresponds to, but you can name it anything you'd like, or leave it as is.
Now we can add the jumping behavior, and finally finish our interaction with MyFirstNPC. To our ConfirmSequence node, we'll ![]() Add a child JumpAction, which does as it says on the tin - makes the NPC jump. Below the JumpAction, let's also
Add a child JumpAction, which does as it says on the tin - makes the NPC jump. Below the JumpAction, let's also ![]() Add a WaitAction, so the NPC can finish their jump before bringing up a final message. Both of these can be found under Action. After these,
Add a WaitAction, so the NPC can finish their jump before bringing up a final message. Both of these can be found under Action. After these, ![]() Add one more MessageDialogAction below them. I'll add a final message to this as so, this time leaving Close After enabled:
Add one more MessageDialogAction below them. I'll add a final message to this as so, this time leaving Close After enabled:

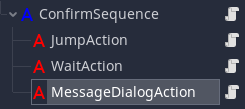
Our ConfirmSequence tree should look as such:
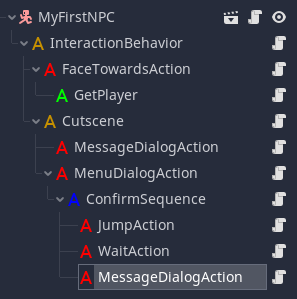
This completes MyFirstNPC's tree, which should look as such:
Go ahead and run the scene to test the completed interaction!
And with that, you've successfully added an entirely new NPC to New Wirral! If you'd like at this point, you can right-click MyFirstNPC and select ![]() Save Branch as Scene to save it as a scene in the filesystem, allowing you to easily place it anywhere else in New Wirral. It's as simple as opening the scene you wish them to be in, and dragging-and-dropping their
Save Branch as Scene to save it as a scene in the filesystem, allowing you to easily place it anywhere else in New Wirral. It's as simple as opening the scene you wish them to be in, and dragging-and-dropping their .tscn file into the tree, positioning as we did before.
If you wish to export your mod at this point, consult the official mod developer guide for further instructions. Thanks for checking out my guide! I hope you found it helpful in some fashion. You can find me in the official Cassette Beasts Discord if you have any further questions or feedback, I'm Topodic there as well.